
How to add a WooCommerce cart widget to your mega menu dropdown
July 2, 2020How to add a cart widget to your menu This tutorial shows you how to add a submenu to your…How can I use dropdowns inside my mega submenus?
February 4, 2015By default, your normal items within a mega submenu will be visible when the submenu is opened. By leaving the…Submenu Types
July 16, 2014Appearance > Menus > Menu Item Settings > Submenu Submenu Types There are 3 types of submenus: Mega, Flyout, and…How to add a Vertical UberMenu in a Sidebar
September 27, 2013Are you using UberMenu 3? Please check out the UberMenu 3: Vertical Menu in a Sidebar article. Adding a new…
Responsive Select Menu
April 1, 2013Automatically turn any WordPress 3 Menu into a select box / dropdown at small sizes.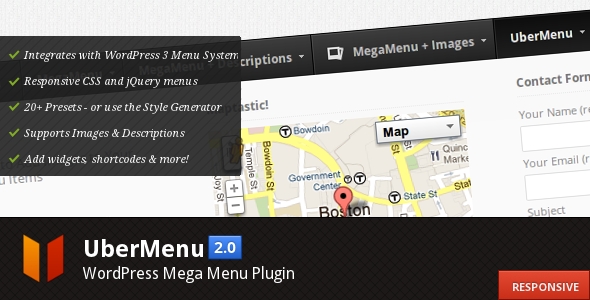
What’s new in UberMenu 2.0? (A Responsive, More Flexible WordPress Mega Menu)
February 10, 2012UberMenu 2.0 - WordPress Mega Menu Plugin brings some awesome new features to the table, including responsive menus, enhanced CSS,…Twenty Twenty One
December 22, 2020Twenty Twenty One will create residual styling on mobile by wrapping UberMenu inside its own menu, and add +/- buttons…WooCommerce
November 30, 2018UberMenu supports WooCommerce Product and Product Category menu items, and includes the ability to add cart summary and mini cart…WPML Compatibility
November 25, 2015Translating Mega Menus for multilingual WordPress sites WPML is a plugin that allows you to translate your website content into…Kallyas (hogash)
July 8, 2015You may need to use Manual Integration to replace the Kallyas menu to prevent the theme from interfering with UberMenu…